


I did not move my websites from GoDaddy for a long time simply because I was frightened about the effort involved in moving my websites to a new web host. I knew I needed to move out of GoDaddy if I needed to improve my website’s performance. But the fear of breaking something kept me from doing it for a long time.

Finally, when I came across the Duplicator WordPress plugin, I decided to give it a try and it was serendipity to see how easily I had just moved my website from GoDaddy to InMotion hosting. That was my first trial to move a website. It was very pleasing experience!
I have since then moved many websites from one host to another for me, for my friends and for a few of my clients. I have moved WordPress websites using Duplicator Plugin, using ManageWP (which is an excellent way to get the job done) and moving everything manually without using any external tool or service. I can tell you today, migrating your WordPress website is not as difficult as it seems.
Moving a WordPress website (even if it is simply a self-hosted WordPress blog) from one hosting service to another is still a confusing topic for many people. Therefore, I decided to share a tutorial with you which will help you (and anyone else interested) to move a WordPress blog from one hosting service to another in less than 30 minutes with zero downtime.
Update WordPress And All Plugins First
You may already have the latest version of WordPress. You may also have kept all your plugins up to date. In that case, you have nothing to worry about.
However, if you haven’t updated your WordPress in a while and some of the plugins need updating, please take time to follow the process of upgrading your WordPress and all the plugins as a first step. The detailed process of updating your plugins is not in the scope of this post. However, as you are reading this post to self-migrate your website to a new hosting server, I assume that you know how to update your WordPress and all your plugins in your existing hosting account.
Once you take care of this step, you can proceed further. Please note that this is a recommended step and not a requirement. If you know what you are doing, you have nothing to worry about.
Backup Your Website Before You Start Migration
First things first. You do know that moving your website from one hosting service to another hosting service is a major task. Therefore, ensure that you have a full backup of your website data:
- Your Website’s MySQL database backup
- Full backup of your wp-contents folder
- Backup of your .htaccess, robots.txt and wp-config.php files
- Backup of any custom folder that you may have created to store custom files such as images, videos etc.
You should use one of many WordPress plugins available. In fact, I have shared a few of handpicked WordPress plugins known to do a great job of taking backup and doing restores for you. I encourage you to go ahead and go through this post to find a plugin that is good for you:
Usually the backup file is a .zip file by most backup services. Once the backup is completed, download a copy of your backup .zip file to your local machine. You can use a FTP service to do that if the backup was created on your hosting server.
Start The Website Migration Process
Since you are migrating a WordPress website, the first thing you should do is to go ahead and install WordPress in your new hosting environment. A fresh WordPress install will give you a fresh My SQL database and the directory structure in place. Now, you can follow the other steps shared below to migrate your WordPress blog into your new hosting environment.
1. Transfer wp-content Directory From The Backup
This is a straightforward step to transfer the wp-content folder from your backup into your new hosting account’s home directory. Since you have installed WordPress in the new hosting account prior to following this step, you will already have this directory existing. You need to delete the wp-content directory in the target location first and then transfer the copy of wp-content from the backup. The steps you will follow will be:
- Connect to your new hosting environment using a FTP client such as FileZilla.
- Navigate to your WordPress home directory
- Delete the existing wp-content directory from the WordPress home
- Transfer wp-content from the backup (you took before starting migration) into the WordPress home
2. Transfer .htaccess And robots.txt From Backup
Now, transfer the .htaccess and robots.txt files from the backup into your new WordPress home of the new hosting environment. It is the same location where you just copied your wp-content folder.
These files are not WordPress files. But these two files are important for your website’s consistent behavior for visitors and search engines. You don’t want to miss this step. But, if you don’t have these files in your old environment, then don’t worry because these files are important to transfer only if you have been using them already in your old setup.
3. Transfer All Custom Directories From Backup
You need to follow this step only if you have some additional directories in your old hosting environment. For example, you may have a directory for custom images, advertisements, PDF files, Excel Files etc. If you don’t have such directories in your existing hosting environment, you don’t need to worry. But, if you have such custom directories, you need to transfer them into your new hosting environment.
Extract all the custom folders from the backup and transfer them into their respective directory paths in your new hosting account. For example, if you had a folder called “advertisement-images” in your WordPress home directory in the old hosting environment, you need to transfer that that directory with all its content into the WordPress home directory of your new hosting account.
4. Transfer Your MySQL Database To New Hosting Account
Your WordPress MySQL database contains all of the website content like posts, pages, categories, etc. When you are migrating your website to a new hosting server, migrating this database is the most important aspect of the entire process.
Export And Import Your MySQL Database Using cPanel
In this step, you rely on the most common way of doing this work – using the phpMyAdmin. It is a two stage process. In the first stage, you will export the MySQL database from your existing (source) cPanel . In the second stage, you will import the exported database file into your new cPanel (target) environment. Let’s start the process.
Stage 1: Export Source MySQL Database
If you already have a backup of your entire MySQL database taken using one of the WordPress backup plugins, you will have a “.sql” file available which contains the export of your database tables and their content. You may also have a copy of your entire hosting account provided to you by your hosting service provider (some shared hosting services provide a backup copy on demand). Even in that case, you should have a “.sql” file export of your MySQL database.
If you have such an export available, you can skip the Stage1 and directly move onto the “Stage 2” where you will import this “.sql” file into your new MySQL database. However, if you don’t have a backup export available with you already, follow along and you will be able to create your own export file in just a few minutes.
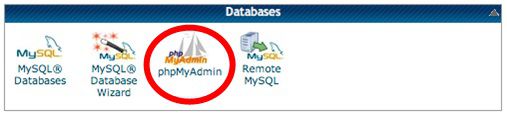
Go To phpMyAdmin From cPanel
Most web hosting companies offer the cPanel to manage your website. Your existing hosting company would have given you this as well. Log into your cPanel and click on the icon called phpMyAdmin as shown in the image below:
Clicking on this icon will open up an application used to manipulate and manage your MySQL database.
Choose Your MySQL Database
When the phpMyAdmin window opens, you will see a column with a list of databases on the left hand side as shown in the image below:
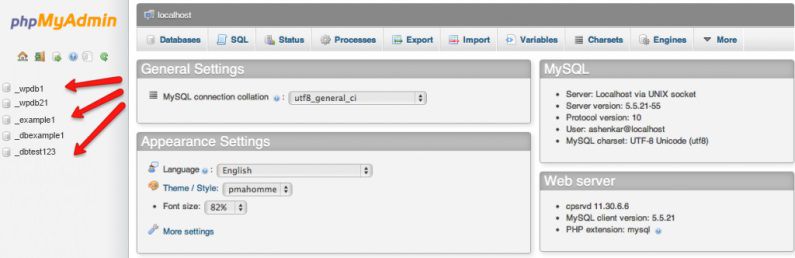
Click on the name of the database used by the website you’re migrating. If you don’t know the name of the database, open the wp-config.php file in your current hosting account and look for the line similar to following:
define('DB_NAME', 'wp_db_name');
In this example, 'wp_db_name' is the name of the database currently in use by your existing WordPress installation.
Export Your Source MySQL Database
When you click on the name of the database on the left hand side, the window will show you the list of tables on the left side and a few statistics about each table on the right side just as shown in the image below:
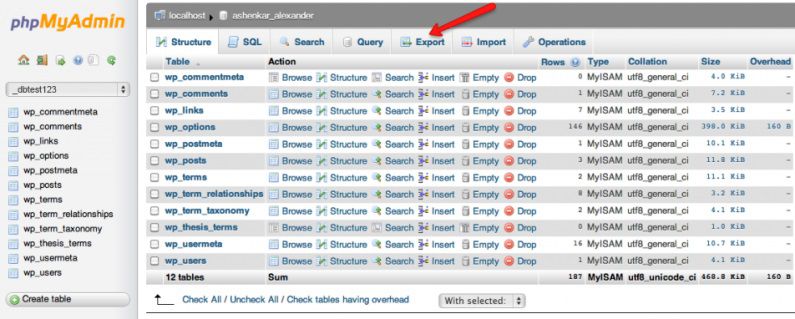
As shown, click on the option to export the database. It will take you to the next screen where it will allow you to choose the tables you would like to export. Scroll down and then select option button with the label “Custom” when you see a choice as shown below:
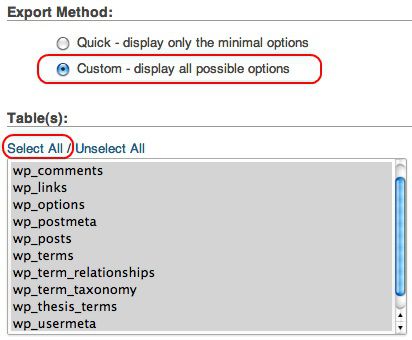
Then, scroll down a little more and you will see the option list, pick ‘SQL’ as the export format.
In the ‘Object Creation Options’ box, select the following:
- ‘Add DROP TABLE / VIEW / PROCEDURE / FUNCTION / EVENT statement’
- CREATE TABLE options
- ‘IF NOT EXISTS’
- ‘AUTO_INCREMENT’
- ‘Enclose table and field names with backquotes’
Select these options and then click on the “Go” button at the bottom of the page. The database export will now save to your computer with a .SQL extension. Go ahead and save the file to your local machine. The export is successfully completed.
Stage 2: Import MySQL Export File Into The Target cPanel
Now that you have the database export file from your previous site, you’re ready to transfer it into the new hosting environment. Follow the steps below to complete this simple process:
Start phpMyAdmin In Target cPanel
Just as explained in the export process, log into your new hosting environment’s cPanel account. Once your cPanel main window comes up, click on the phpMyAdmin icon to go to your MySQL databases.
From there click on the name of the database which is being used by your target WordPress installation. If you don’t know the name of the database, check the wp_config.php file on the target hosting home and find out the name of the database.
Drop All The Tables In The Target Database
When the database table list is displayed (as shown in the image below) it is important to make sure that the current database is emptied of its content.
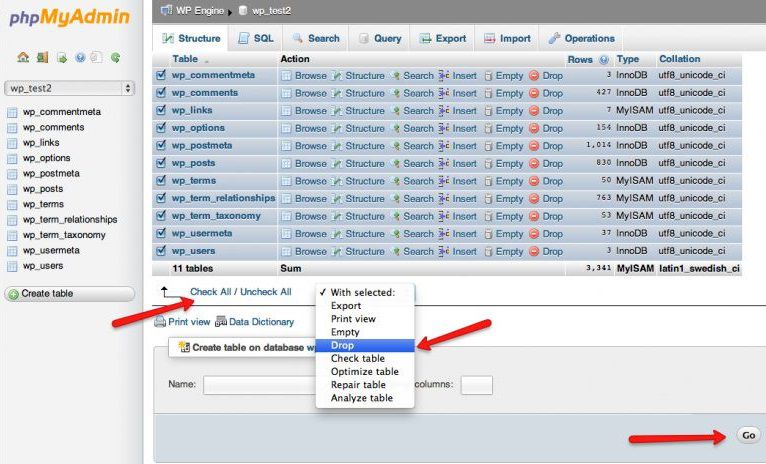
Click on “Check All’ to select all of the database tables, then from the drop down menu select ‘Drop’. Next, click on ‘Go’ in the bottom right corner. It will then show you another prompt where it will ask you to confirm if you want to drop all those tables. Say “Yes” and this will drop all the tables along with their data in your current MySQL database.
Import Tables From The Export File
Now that the tables are dropped, you are ready to import the database in your new and clean MySQL database. Click on the ‘Import’ tab in the menu as shown in the image below.
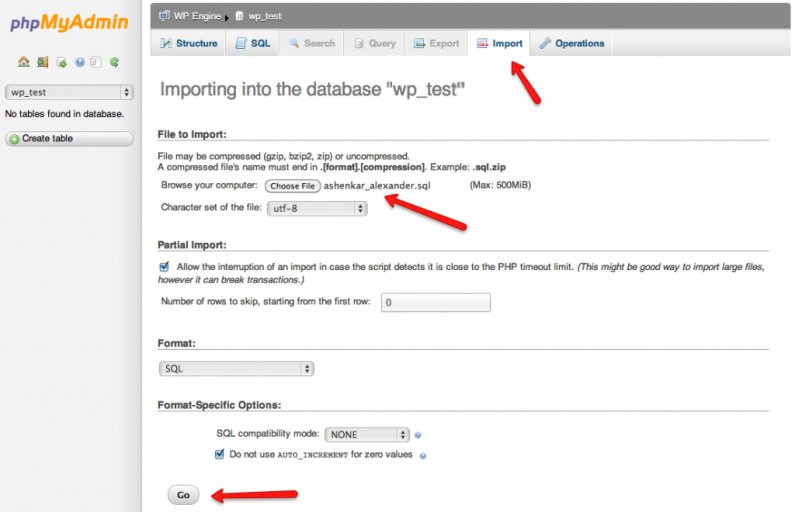
Next, click on ‘Choose File’ and select your database export file. Finally, click on ‘Go’ at the bottom of the page.
If the import is successful, you will now see the tables created in the target MySQL database. You will see that the data in these tables represents your website data. This completes your export and import process for the database.
At this time, you already have your flat files, directories etc. transferred into your new hosting environment and now you have your database also successfully transferred into your new cPanel account. You should be looking good from every perspective now. It’s time to proceed with the next steps in this process.
5. Change The Nameservers For Your Domain
[note background=”DCDCF1″] You don’t need to follow this step if you have CloudFlare implemented on your website.[/note]
The final step of the migration process is to direct traffic to your new hosting space. In other words, when people go to your domain name, you want them to see the website hosted on your new web server. This will require updating your domain’s DNS zone file record with your new Nameserver information.
Your new hosting provider would have provided you two Nameservers something like:
NS1.YourNewNameserver.com
NS2.YourNewNameserver.com
You need to login to your domain registrar account and then start your domain manager to edit the DNZ zone file. You will see the option to update your Nameservers. All you have to do is, replace the existing Nameservers with the new Nameservers. This change may take about 4 hours to take effect. But when this is in effect, your website traffic will automatically be directed to your new hosting server.
6. Update The ‘A’ Record – For CloudFlare Customers
If you have implemented CloudFlare on your website, your DNS zone file is maintained by CloudFlare and they want your Nameservers to always point to their Nameservers. Therefore, you will not need to make that change in your DNS file. However, you do need to change your ‘A’ record to point your website at your new hosting server.
For that to happen, you need to know your new IP address. If you don’t know it, check with your new web hosting service provider and they will help you find out your new IP address. Once you have that information, log into your CloudFlare account and then choose the option to go to ‘DNS setttings’ for your website. It will show your DNS Settings where you will have the opportunity to edit your ‘A’ record as shown here:
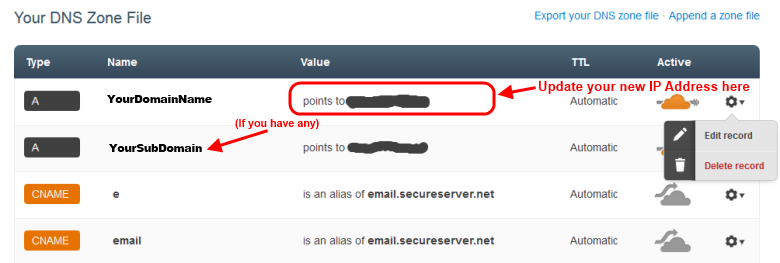
Basically, the ‘A’ record in your DNS Zone file controls what IP address your website traffic goes to. You will locate the ‘A’ record instances of your current IP address and replace it with your new IP address. Cloudflare will automatically save the changes for you.
On average, it takes about 4 hours for the DNS record change to take into effect, but technically speaking it may take as long as 24 hours total. Once DNS record changes are in effect, your website traffic will start directing to your new hosting address with CloudFlare working as usual for your website.
7. Check And Fix Permalink Structure Of Your Website
Although everything would have gone right if you followed these steps, it is a great idea to log into your WordPress admin area and visit your Permalink Settings to ensure that your permalink structure is intact. Even if it looks good, click on the ‘Save’ button anyway.
8. Check All The Plugins In New WordPress Installation
In the end, it is also important to visit your ‘Plugins’ menu from WordPress dashboard to ensure that all your plugins have been migrated and they are all active. If there is any plugin which is not active, activate it. Make sure every plugin is doing the work it is supposed to do and it has its settings intact.
9. Test Your Website – Visit Your Posts/Pages
In the end, go ahead and test your website. Make sure your pages and posts are loading correctly. Make sure all your links are working and comments are being displayed. May be, test your comments by placing a comment or two (you can delete those once the test is complete.)
If everything is working as expected, congratulations! You have just successfully moved your website into a new hosting environment.
Questions & Comments: If you have any questions or suggestions, or, if you face any challenges during the process, please feel free to interact with me in the comments section below. I will be happy to provide you additional information if needed. Thank you kindly!


Wow this must have taken you a while to write up. Great tutorial on how to move a WordPress site. I haven’t done it manually in a while. Although I know how. I prefer to use plugins that make it a whole lot easier.
One thing I have noticed though is that plugins don’t always work. Whenever someone asks me how to move a site, I am going to point them to your site. I tend to get that question quite a bit from people who sites from me. Thanks for sharing.
Hello Susan, Yes, it took a while to write this post. But now that I have it published, I hope it helps people who are not using some of the premium plugins like ManageWP. This is manual process, but gives us the control on what is happening. And it works 🙂 As you said, plugins sometimes do not work and in those cases, this is the way to go. So, here it is!
Thanks Kumar for a perfect guidelines for those serious bloggers who intend to migrate to a new server for better performance of their website but hesitate to do so. Several technical processes you have mentioned in a very simple manner which will definitely help a lot of people. Thanks again.
Thank you very much. Yes, I hope it helps a few people 🙂
Hi Mr. Kumar, I’m agree with you it may help few people 🙂
Transferring a website can be a nightmare for someone, some hosts offer this for free and can be done with just 1 command line using SSH. Don’t worry anymore about all those steps above.
Thanks a lot for this detailed and informative post. I am planning to soon migrate my WordPress website to a new web host. Although your post explains everything pretty clearly and precisely, I am not sure I am tech savvy enough to carry out the whole operation by myself.
Hi Kumar,
Oh my, this is a little eBook. As a matter of fact, have you thought about doing just that with that type of content?
I could also read a whole post about backup. Two weeks ago I deleted a whole post of my personal development blog by accident, and I wasn’t able to get it anywhere. Whatever plugin I have seems to have been useless. Anything you recommend?
Hi Sylviane,
Do you take a daily backup of your blog? If so, then you still may be able to recover the post.
Let me know and I can suggest a few things based on your response 🙂
Regards,
Kumar
Very well explained and pictures used in the post are also good. I did transfer my site and at that time i’m in a search of this article anyways thanks it’s recall that moment.
Hi Kumar , This is an well planned and awesome loving post. All thing is well explained that there i can do all thing by this post without any help. thanks for such a beautiful post