
So far, we have discussed purchasing your domain, selecting WordPress as your website design platform, and then purchasing your web hosting account.
The next step is to install WordPress CMS in your new hosting account for your domain. This step, as soon as completed, will get the basic foundation of your website up and running. Let’s discuss how to do that in this post.
Do not be intimidated by the name of this step. This is the simplest of steps involved in your website setup. You can literally get this installation and basic setup done in less than 5-10 minutes of your time. Just follow the steps and you will be amazed how easy it really is.
Guide To Install WordPress In Your Hosting Account
Now, I assume that you would have purchased your new web hosting account with one of the services providers we discussed in the last post. With that understanding, here are the instructions to install WordPress for your domain with each of those web hosting services.
Depending upon the service provider you chose for your website, follow the installation procedure of your host:
- WordPress Installation Guide for InMotion Hosting [YouTube]
- WordPress Installation Guide for iPage [YouTube]
- WordPress Installation Guide for Web Hosting Hub [Step by step instructions]
- WordPress Installation Guide for BlueHost [YouTube]
- WordPress Installation Guide for HostGator [YouTube]
Note: If you chose to go with WP Engine, your WordPress installation is essentially done by them and here is the installation guide with steps involved in getting that done.
Important Information On NameServers
Once the installation of WordPress is done, if you did not do so already, REMEMBER to change the nameservers of your domain to your new web hosting company’s name servers.
This step is necessary if you purchased the domain with one company and purchase your web hosting account with another company.
Nameservers of your domain are the things that will translate your domain name to the actual location of your website. If your domain is registered with GoDaddy, here are the instructions for setting nameservers for your domain names.
Similarly, if you have your domain with NameCheap.com, your instructions for nameserver changes will be slightly different. Check them out and follow the steps they suggest.
Each domain registrar will have their own instructions on how to change nameservers for the domains they service. Check with them and make sure you take care of this step.
WordPress Configuration Setup After Installation
As soon as your WordPress installation is completed, you will receive an email from your hosting provider that WordPress is successfully installed on your server. The email will contain following important information for you:
- Your website URL (Format: http://www.<YourDomainName>
- You website’s WordPress Admin URL: http://www.<YourDomainName>/wp-admin
- Your WordPress Admin USER ID (Such as “admin” or “Administrator”)
- Your WordPress Admin Password
With this information, you should now be able to log into the administration section of your new WordPress powered website. Go ahead and login now because there are a few basic setups you need to complete right away. Let’s get started:
- From the Users menu, go to Add User and create a new user for yourself. Give yourself the Administrator privilege. Choose a strong password and fill out your profile details (Bio) properly including your Social Media profile URLs.
- From the Settings menu, go to the General submenu. You will have options here to provide your Site Title, description of your website, date and time settings etc. Update all of the fields to their appropriate value. If you don’t want to allow others to register on your website, make sure that the “Anyone can register” box is unchecked.
- From the Settings menu, go to the Permalinks submenu. This allows you to select the format of the URLs for your posts and pages.
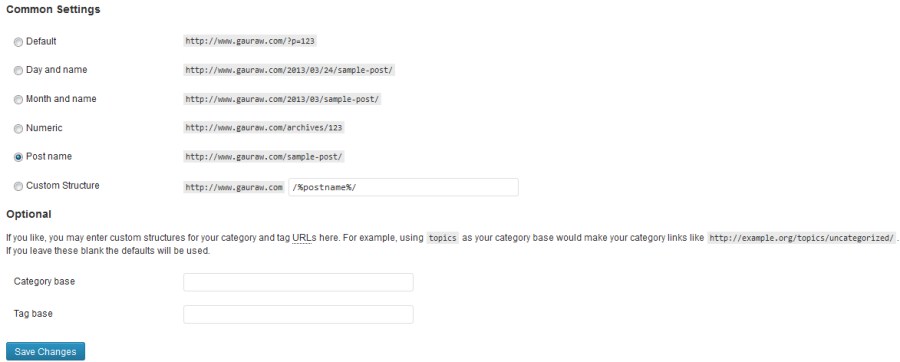
WordPress gives you a default URL structure of something like www.<YourWebSite.com>/?p=123 which is bad for your SEO since Google tries to infer the keywords for your page looking at your URL as well and “p=123” type structure offers nothing of value.
Therefore, change it to something meaningful as shown in the picture above. It will be beneficial for your website now and in the long run.
- Navigate to the Comments menu and remove all comments that WordPress has created as part of the installation.
- From the Appearance menu, go to the Widgets sub-menu. Now, from the last column (usually called a Sidebar), remove any sidebar widget that you don’t want to see in your website. Simply click on the widget and then click on the “Delete” link to remove it from the sidebar. You can also add any new widget that you would like to show on your website by dragging from the left side of available widgets into the Sidebar area.
Burn A Feed For Your Website Using Feedburner
As you are setting up your website, it is important to realize that every major blog uses Feedburner today. They use it to burn their RSS feeds simply because it is a free and feature rich system.
You need to burn a feed for your blog and integrate it with your WordPress to bring your blog to the professional level and to allow your readers to get an RSS feed of your blog posts. Here are some of the highlights of the Feedburner features:
- Feedburner provides choice options to your visitors to subscribe to your blog by Email and/or other feed-readers (Netvibes, Google etc).
- Feedburner allows you to analyze your subscriber base by providing number of subscribers etc.
- Feedburner gives you the option to ping various feed-reading services once you publish your posts. This is definitely a desired service if you want traffic to your website.
It is a Google service and therefore, as long as you have a Gmail account, you are free to go ahead and burn your feed. Just go to Feedburner.com, login with your Gmail account credentials and burn the first feed for your blog as the first step.
As soon as you login, the first thing it will ask you is the name you want to give your feed (give a short one-word name preferably matching your domain name) and the URL of your website.
Provide these details and have your feed ready in a matter of seconds. Make note of your feed URL because you will need that to integrate your new feed with your website that we will discuss in the next step, as we discuss about choosing and configuring a good theme for your website.
CONGRATULATIONS! Your website is now live.
Have YOU Subscribed To Receive This FREE Website Setup CourseYet?
Next Step: In the next post in this series, we are going to discuss how to choose the best theme for your website with features that you need. We will also discuss how to install your new theme and how to configure it with the options you need.